Advice: Use the Canvas “Grace Period”

Students are filling out Canvas Surveys this week as part of my mid-semester evaluation process, and I’ll be reporting back on that after Spring Break… one survey result popped up yesterday, though, that caught my attention because for the question soliciting “advice to instructors using Canavs” the student wrote something in all-caps:

The Grace Period is a term I use in my classes to refer to the difference between the soft deadline at midnight and the hard deadline at noon the next day. I really like how Canvas makes that easy to do, unlike D2L. I wrote a post about this last Fall, so I am reposting it here, prompted by my student’s plea to faculty in all-caps! 🙂


Today I want to focus on what I think is one of the best features in Canvas: there are two different “deadlines” for any assignment, not just one. Generically, these are usually referred to as “soft deadline” and “hard deadline,” although I like to call it a “grace period” when explaining the system to my students.

D2L did not have a two-deadline option — not for quizzes anyway, although for reasons unfathomable to mere mortals, they did offer it in the Dropbox (which I never used). In Canvas, it’s consistent across the system: if you have a due date, you can choose a soft deadline and a hard deadline, and I would urge everyone to consider taking advantage of this system. I cannot imagine teaching without it! In my classes, I use the “grace period” as an automatic emergency extension, no questions asked, so that if students are a little bit late with an assignment, they can still turn it in, no problem, no penalty. Specifically, I have assignments that are due by midnight on such-and-such a day, but there is a grace period until noon the next day, and I offer that “grace period” for every assignment in my class.

Advantages. There are several advantages to this approach.

Just practically speaking, it means that midnight does not become some kind of fetish. Sure, if I say something is due on Tuesday, I’d like for them to finish the assignment on Tuesday, but it honestly doesn’t make any difference if students turn something in at 2AM as opposed to midnight. I’m not awake at 2AM, but I know that many of my students are.

This approach also respects the fact that there are all kinds of emergencies that come up in people’s lives; that’s only natural. Students shouldn’t have to share those details of their private lives with me, and they shouldn’t need me to pronounce on what is a “legitimate” emergency or not. If they consider something an emergency so that they are not able to finish an assignment on time, that’s totally their decision, and they can finish up the assignment the next morning.

I also offer extra credit options to make up for assignments they miss if the grace period is not enough; I’ll write about that in a separate post.

Grace period in D2L: so clunky! When I used this system in D2L — and I did, for many years — it was really clunky. D2L has only one possible deadline you can set for a quiz (which is how my students “turned in” all their assignments), so I had to make it the noon deadline of the following day. I would title each assignment based on the day it was due — “Wednesday Storytelling” for example — but that assignment would show up as due on Thursday at noon in the calendar.

screen-shot-2016-11-15-at-11-37-43-am

Even with that serious drawback, I did use this system in D2L, and I was really excited when I learned that this is an easy-to-design option in Canvas, something that is officially built in as part of the assignment/calendar system.

Here’s how it works in Canvas:

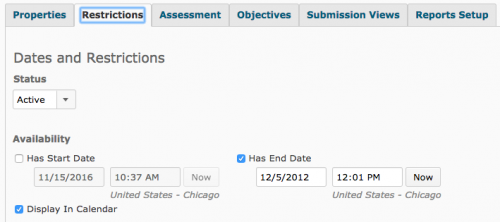
When you set the availability dates for an assignment, you have three different dates you can enter:

screen-shot-2016-11-15-at-11-44-32-am

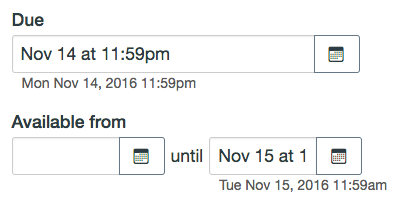
  • Due: The due date is what shows up on the calendar. All my assignments are due on a specific day, and I let it default to the Canvas end-of-day time which is 11:59PM.
  • Available from: This is the earliest possible date on which students can complete an assignment. I use this option for only a few assignments. I prefer for students to work ahead whenever possible so, as a general rule, all my assignments are available starting on the first day of class, which means I leave this option blank.
  • Available until: This is when the item actually becomes unavailable to students. So, for this, I set the available until date for every assignment be noon the next day (I use 11:59AM instead of noon to parallel Canvas’s default use of 11:59PM for midnight).

The grace period is that gap between the “due” date in Canvas and the “available until” date.

Gradebook highlighting. If a student turns something in during that grace period, it shows up as a red in the Gradebook, but with no penalty. To be honest, having those red highlights is not very useful. You can see the splotches of red in the Gradebook; here is a screenshot of my smushed Gradebook (more about the awful Gradebook in a separate post) that shows the pattern of grace period use in one of my classes:

screen-shot-2016-11-15-at-10-47-55-am

Instead of those splotches of red, I would actually prefer a real report about students who are using the grace period a lot so that I could share that data back with students. Is that possible? I couldn’t find anything like that in the Canvas documentation, and given the extremely in-flexible and un-useful Canvas Gradebook, I guess I am not surprised. If I had such a report, I could share that report with students who are struggling with time management so that they would know just how often they are using the grace period. They could then could consider making it a personal goal to use the grace period less often, but Canvas unfortunately doesn’t give me any data to use in that way (at least not that I can find out).

In terms of my Canvas advice tips, I would rate this one at the very top: it really does help students! So, I would strongly urge faculty to consider using this two-deadline option in Canvas. You couldn’t set a grace period with quizzes in D2L, but now with Canvas, you can!

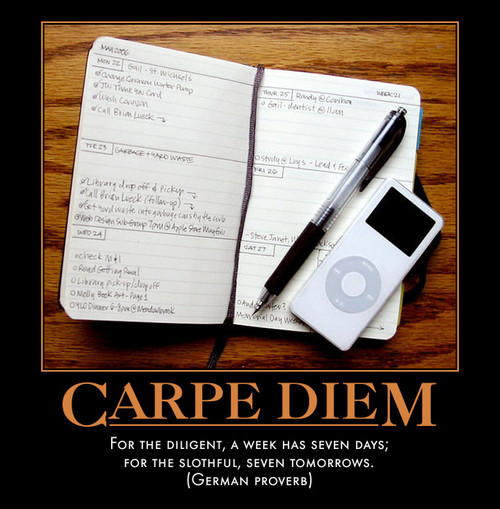
As for procrastination: it’s a proverbial problem, something that we are all struggling with: For the diligent, a week has seven days; for the slothful, seven tomorrows. I am grateful for any and every tool I can use that will help my students to manage their time in positive, successful ways.

Carpe Diem

carpe

Crossposted at OU Canvas Community: Instructional Designers.

Advice: Course Images and Flickr

Yesterday, I wrote about using course images for the course cards on the Canvas Dashboard, and I wanted to follow up on that with some specific information about how you set up the course image, because it is really pretty cool: you can choose an image directly from CC-licensed images at Flickr! So, don’t worry if you don’t have some images lying around that you could use for your course; just look for something at Flickr.

Here’s how it works:

When you go to Canvas Settings, you will see your course image information right there at the top.

screen-shot-2016-11-17-at-9-57-53-am

When you add/change the image, you have two different options: you can upload an image from your computer, or you can search at Flickr.

screen-shot-2016-11-17-at-9-58-28-am

Just enter a search term, and it will show you different options to choose from. For this class, I entered the search term “Stonehenge,” for example:

screen-shot-2016-11-17-at-9-58-43-am

Pretty nifty, isn’t it?

So, there’s really no excuse NOT to use a course image of some image of some kind, thanks to the treasure trove of images you can find at Flickr. Kudos to the Canvas designer who built that option into the system!

And speaking of excuses, there’s also no excuse not to join the OU Canvas Community: it’s a fun space in which to connect, share ideas, and get answers to questions! Kevin Buck has it all set up and ready to go if you want to join: OU Canvas Community. I’m crossposting this blog there every day. 🙂

Advice: Use a Course Image

I was really excited when Kevin Buck, our intrepid Canvas admin, agreed to turn on the course image option for us; that was a new feature that Canvas just released in September of this year. With this release, you can have an image for your course on the Dashboard instead of a (boring) color block. So, for example, here is what my Dashboard looks like:

screen-shot-2016-11-16-at-9-59-08-am

Each of my courses has an image there; the colored block is for a Canvas training course in which I am a student, not an instructor, and only instructors can set a course image. Just speaking for myself, I think students should be allowed to choose course images for themselves, but that is not the Canvas it-shall-all-be-standardized way.

Course images: fun and useful. As students have more and more classes on their Dashboard, the visual cue provided by a course image can help them quickly find the course they are looking for. I know the students value it, because they spontaneously mentioned this feature in the midterm Canvas survey I conducted. In the “Advice to Instructors” part of that survey, they said: “set a picture on the main page” and “I like most how the class link on the Dashboard has an image compared to my other classes that are set colors.”

Color overlay problem. As you can see in the screenshot above, a course without an image is identified in the Dashboard by a solid color block, and those colors correspond to the display color for each course on a student’s course calendar. The instructor sets a color default, but students can change the color; they need to be able to do that to make sure sure that their courses are different colors. As you can also see in the screenshot above, the color feature is causing a real problem for the course images: Canvas is displaying the image under an opaque color overlay (instead of a solid color block), and that’s why my course images look very washed out. Not good, but I am confident there will be a fix for this soon. Within days of the release of the course image option, there was a request from the Canvas Community to fix the color overlay problem; you can read about that here: Remove colour overlay from course cards that have an image. Because I am a Canvas minimalist, I have almost no interest in the (many) feature requests coming from the Community, but this was a feature request that I followed with great interest; it was fun to participate in that discussion and I was glad to be able to contribute my thoughts about it. The feature was quickly voted up, and I am waiting to see what happens next.

Even with the color overlay problem, the course image option is a good one, and it will be even better when that problem is fixed. With more and more of our courses being on Canvas, students’ Dashboards will get busier and busier. I am sure they will appreciate when instructors take advantage of this option to improve the Dashboard display by using the course image option. Plus, it’s fun to pick the image you want to use. I’ll have more to say about that in tomorrow’s post. 🙂

A picture is worth a thousand words.

thousandwords

Crossposted at OU Canvas Community.

Advice: Keep Canvas Modules Current

In my previous post, I wrote about the importance of faculty voices, and how useful it would be if we shared our insight with each other and advice based on our experience teaching with Canvas, something that a marketing team cannot do: Moving from Marketing to Conversation. Those weekly marketing emails would, in my opinion, be much more effective if they shared stories from actual faculty using Canvas and solicited advice from faculty based on their experience. In the meantime, I will be using the “Advice” category for posts that are explicitly about what I’ve learned from using Canvas that might be useful to other faculty. I’ve also created an Advice section in the weekly Index posts that provide a blog inventory.

So, here is my advice post for today: keep your Canvas Modules current. It’s easy to do! You just need to move the current Module up to the top of your Modules list as the weeks go by, moving the completed Modules down to the bottom of the list.

Here’s one of my courses, Myth.MythFolklore.net (the courses is completely open; just click-and-go, no log-in required), and you can see how it looks now, in Week 12 of the semester when we have just Weeks 12-13-14-15 remaining. Then, below Week 15, you can see the completed weeks, starting with Week 1: 

screen-shot-2016-11-14-at-9-36-37-am

So, each week on Monday as the old week ends and the new week begins, I go into the Modules list and move (drag and drop) the completed week down to the bottom. It takes just a second, but it matters to students, as I learned from his comment a student made in the Fall 16 Canvas Survey. This is what the student said in the “Advice to Instructors” portion of the survey:

Please adjust the settings of the modules to load the current week at the top. It has made a great deal of difference in getting to the modules I need quickly and efficiently. We’re covering a lot of material, and I like that the material we are finished with is at the bottom of the page.

The students had other advice about using Modules also:

  • Use the modules page for documents so that students can see a preview before downloading.
  • Posting things to “Modules” and “Files” gets confusing so I would only choose one to use.
  • Use the modules as a week by week guide for what’s going on in the class.
  • Please utilize the module tool for grouping content.  It makes the canvas page so much easier to navigate.

Given that we didn’t have Modules as a design feature in D2L, it’s something that will be new to both instructors and students… and it’s one of those new features of Canvas that is definitely worth using. So, remember to use the Modules! Your students will thank you. And it will just take a minute each week to keep the Modules current by moving completed Modules to the bottom of the list.

Additional details. Since I am using the Modules only to group quizzes (that’s how the students do their grade declarations), I had three choices of how to provide access in the left-hand navigation bar: Modules, Assignments, or Quizzes. I tested them, and the Modules page loaded much faster (MUCH faster) than the Assignments or Quizzes pages. So what I did was to just suppress the Quizzes tab, and instead of the regular Assignments tab, I created a redirect link to my class calendar page. For that, I had to use the very annoying Redirect Tool that scares students with a warning that they are leaving the Canvas space… but I’ll save that rant for another day.

And here’s a growth mindset cat to inspire your design efforts:

I plan; I design; I create.

i-plan-i-design-i-create

Crossposted at OU Canvas Community.

Think Before You Link: Creating a Canvas URL

Today I want to write about something that may look small, but it is actually really important: how to create your own custom URLs to counteract the disposable course approach of the LMS. If your school is like mine, the LMS is going to create a new course space for you semester after semester, even when the course is the same. Instead of removing the current students and loading in the new students, there is going to be a completely new course space: an empty space, on the assumption that nothing you have from last semester is worth keeping (sad, isn’t it?). Sure, you can copy your course content over to the new space, but it’s a new course, with new URLs, as if your old course never even existed. Disjointed, disconnected. Like so much of the school experience. In this way, as in so many other ways too, the LMS is a tool for school administrators, not for instructors, and it does not care about giving you any course space stability.

But if you create your own URL and then point it to your course, you can then repoint the URL each semester. Your course URL can remain the same, even if Canvas insists on throwing out your course and creating a new one every semester.

So, for example, one of the first things I did as a Canvas user at my school was to create URLs for the two courses that I teach every semester; they are totally open courses, so go ahead and click and see:
Myth.MythFolklore.net for Mythology and Folklore
India.MythFolklore.net for Indian Epics

You’ll see those are both subdomains on my MythFolklore.net, which is a domain name I own and control (I keep my “omnifeed” on display there as my personal homepage). All I had to do was create the two subdomains (that takes about a minute), and then create a little redirect file (that takes about another minute). All done.

Those are clickable links, easy to type, and easy to share. You can see how they redirect here:

Myth.MythFolklore.net resolves to:
https://canvas.ou.edu/courses/23183/wiki

India.MythFolklore.net resolves to:
https://canvas.ou.edu/courses/19837/wiki

Those are my Canvas courses for Fall 2016, code names “23183” and “19837” (I have no idea where those numbers come from; they just are what they are). If you are curious why I redirect to the wiki homepage for each course, you can find out all about that here:  Blogger Announcements as Canvas Homepage.

My Spring 2017 course spaces already exist in Canvas: the Myth course is going to have the magic number 31878, and the India course is going to have the magic number 31889. So, after the Fall semester is over, I will go into my MythFolklore.net control panel and update the redirect file, changing the magic number of the Fall edition to the magic number of the Spring edition. That will take me all of one minute to do. Presto: my old URLs will resolve to the Spring 2017 web space for each course.

As a result, my custom URLs will continue to work anywhere and everywhere that I have shared them, semester after semester, always taking people to the current version of each course. Since I don’t have any content in my courses, that solution is good enough for me; I don’t need to share more than just the basic URL.

IMPORTANT: If you are putting actual content in your Canvas courses, I would strongly urge you to think about creating a freestanding resource site instead of dealing with the nightmare of all your course content having new URLs every semester; you can read more about that here: Open Content: Resources, not Courses. This URL, for example — Canvas.MythFolklore.net — goes to a Canvas space I have created as a permanent content resource (a demonstration course for growth mindset and live content), not as a disposable course.

For this little hack to work, you need to be able to create custom URLs in a space you control. At my school, we are so lucky to have Reclaim Hosting’s Domain of One’s Own program, branded OUCreate, which gives faculty, staff, and students their own web space.

web_bug_script_red

You can get a very inexpensive domain of your own, or you can use a create.edu subdomain of your own for free. You can host your own blog (like the blog you are reading right now), build websites and wikis, and you can also run database-driven applications, etc. I hope every OU faculty member will consider making use of OUCreate, even if it is just to give yourself some URL stability in a world of Canvas chaos!

So, think before you link! By creating your own custom URLs, you can give your Canvas courses a lasting identity, instead of a disposable one.

I have control.

control


Crossposted at OU Canvas Community.

Open Content: Resources, not Courses

Yesterday I wrote about Open Syllabuses in Canvas, and I am a true believer: I would rate open syllabuses as my single biggest goal for Canvas at OU and, if anybody wants my opinion (ha ha), I would rate the number of open syllabuses in our Canvas system as a metric of success. For people who want metrics.

But content in the LMS: yikes, no. A thousand times no. I would never … let’s be clear: NEVER … recommend that anyone put any content in the LMS. There are so many better options! That is just my opinion, though, and I know that others feel differently. Canvas, unlike D2L, does allow for open content, and it even allows you to create persistent content on the Internet. That’s all very different from what D2L offered to us before.

For me, being able to get massive quantities of content online quickly and easily is the key, so I prefer to use blogs. That might seem weird, but it works great for me: blogs are very quick, they have good auto-navigation with labels, and they are linkable, searchable, scalable, and durable. The complete (and massive) UnTextbook for Myth-Folklore is a blog, the evolving (and also massive) Freebookapalooza library of free books online is a blog, and so on. That’s a solution I like, and there are so many other great solutions, especially now with OU’s Create.ou.edu project (see more about that below).

The traditional LMS, on the other hand, is a terrible solution for content. Totally aside from the specifics of each system, the overall purpose of the LMS defeats the content: the LMS is built to support courses which disappear at the end of a semester. At the end of each semester, what happens? Students — gone. Content — closed. And links — broken.

But, you say, I can extend the closing date of my course! Sure, you can do that. But what are you going to do when you offer the course again, with a new course space in the LMS filled with a new cohort of students? You are going to copy the content over — which is a disaster for sustainable, durable, shareable content. You don’t want multiple copies of content floating around. Instead, you want a stable location for evolving content where you can use, re-use, and improve course content over multiple classes and multiple semesters.

You need content as a lasting RESOURCE, not content that lives and dies with each expiring, self-destructing course iteration.

And Canvas, thank goodness, gives faculty one possible solution to this problem. Just like D2L, Canvas will automatically generate new course spaces for you every semester, but unlike D2L, with Canvas you can create your own spaces too. You don’t have to ask for an admin to do that; you can do it yourself. So, with just one click you can generate a Canvas space to use as an open, linkable, lasting resource that persists from semester to semester.

Here’s an example: this summer I created a Canvas course that I filled up with content, and you can see that here: Canvas.MythFolklore.net. It’s actually a two-fold experiment: it is a resource for Growth Mindset materials, and also a resource for live content strategies (embedding, javascripts, etc.). I’m personally not interested in any of the Canvas content management features like Modules, etc., but I could use those content management features if I wanted, just like when building a course.

So, when you see your Canvas course space automatically generated for you, don’t just leap into putting the content there. Step back and take a moment to ponder and plan: you have options!

And SPEAKING OF OPTIONS . . . 

You should definitely check out an amazing option that goes far beyond what Canvas could ever make possible: CREATE.OU.EDU. For serious content development, you need a domain of your own. And Create.ou.edu awaits you. 🙂

Find your own path!

21858691544_91582c0f5d_o

Crossposted at OU Canvas Community.

css.php